Showing posts with label DIY. Show all posts

Tuesday, April 18, 2017

DIY Vapor Rub Shower Melts


I am so in love with vapor rub. You may remember my post 10 Uses for Vapor Rub, or 5 Chest Rub Hacks for Babies, and this Vapor Rub Scented Candle. And if those aren’t enough to convince you I am back with more! One of the littles was sick this week and just as stuffy as could be. Insert sad face here. After she was pretty sure I was the Wicked Witch for making her take medicine (side note…Hey pharmaceutical companies, it’s the year 2015. Medicine should be tasting like bacon now. Stop making it taste like rancid fruit juice.) I made her a peace offering of these homemade vapor rub shower cubes.
Now before you go thinking I Betty Homemaker, think again. These are so stinking easy to make, and you can whip them up in about 20 minutes. The end result is a vapor rub infused bath cube that you can place in the shower for instant relief from nasal congestion. Want to make your own? Let’s get started!
Here is what you will need to make your own Vapor Rub Shower Cubes:
Ice cube tray 

3 tablespoons of vapor rub (Maty’s makes a petroleum free, all natural variety with eucalyptus, peppermint, and wintergreen found here for around $5. It is amazing, it is safe for use with children, and I highly suggest it!)

1 cup of corn starch
2 tablespoons of water
Mixing bowl
Blue and green food coloring (optional)

Once you have your supplies, you are ready to roll. As you can see, chances are you already have these items in your home. Oh and when you are done with this recipe, check out my recipes for Vaporizing Bath Bombs and Vaporizing Bath Soak too!

Tuesday, April 11, 2017

The 5 Biggest Mistakes You Make When Painting Furniture


Improve a less-than-stellar piece with paint, patience, and my tricks. I had the oops moments; now you can learn from them.

There's no shortage of tutorials about painting furniture online. And I've used a lot of them to paint dressers, console tables, chairs, mirrors, and more. But I have found problems/issues with a lot of the tutorials—paint chips, finishes aren't smooth, and paint peels. I have had to redo several furnishings, so I decided to compile all the mistakes I've made to help you give your furnishings a makeover that will last.
Here's how to paint a piece of furniture—without making a major mistake:
1. Sand it. There are lots of tutorials out there that claim you don't need to sand. There are also lots of primers and paints promising no sanding necessary. From what I have learned, sanding is a must. Sand all surfaces with 150-grit sandpaper. (I use this orbital sander with variable speeds.) Be careful not to gouge the surface. You're just looking to rough it up a little so the primer has something to adhere to; you're not trying to strip the surface. Use 80-grit if you are sanding a furnishing with an existing varnish.
2. Remove residue. Wipe down the surface with a tack cloth to remove any residue. Do not use a paper towel. Don't speculate on whether something is a lint-free cloth. Just use the tack cloth.


Friday, March 31, 2017

Nesting Bunny


Oh my I don't have any words for this very cute little bunny. I found this a couple of years ago and I feel deeply in love with how cute and simple this is. I love that the whole thing has a vintage spring look to it. I feel that the vintage Easter/spring look is so beautiful and I have been slowly changing all of my spring collection to be vintage. 

I can't wait to get this made for my own home. I feel bad keeping this beautiful secret to myself so I thought that I would share this even though I haven't made my own yet. 

What do you think? Is this cute or what!


Saturday, February 4, 2017

13 Fun Festive DIY Kids Valentine's


Ah it is that time of the year again when mothers everywhere begin the mad hunt for the best valentine's for their cuties to take to school. Yup Valentine's Day is just around the corner and if you are like me then you are not ready at all. No worries, I have you covered! I found 13 of the cutest {and easiest} valentine's for you and your kids to put together for their parties at school. Plus most of these valentine's are non candy valentine's so that is just an added bonus. Who wants all the sugar anyway?


Friendship Bracelet Valentines


VALENTINE PAPER FORTUNE COOKIES


PLAY-DOH VALENTINE


Got my EYES on you Valentines


Watercolor Valentine


YOU BLOW ME AWAY VALENTINE

Saturday, March 5, 2016

DIY Yarn Bunnies!


So, you all know about my illustrious grandmother who was a professional tailor, right? And how, as a consequence of her instruction and mentoring, all the women in our family in the generation after hers are accomplished garment seamstresses? Now, Grandma lived with us for many years before she moved to a nursing home. I was in elementary school then, and too young to be interested in drafting and tailoring, which was a shame. Fortunately, Grandma also loved crafts of all kinds, some of which were kid-appropriate. Her closets were full of fun craft supplies that I spent many afternoons digging in, just to see what I could find. Sometimes, she would take me to a store called Golden Dragon, which was the Singapore equivalent of Michaels, the craft store we have in the US. And, like Michaels, this store offered classes. The one I remember most vividly was on making pompom animals - you'd buy their pompom tool kit, yarn, glue and scissors and they'd teach you for free. When I was about 8 or 9, Grandma brought me there, sat me down at the tables, made the necessary purchases and we spent that afternoon making a chick and a rabbit. When we left for home, she bought more yarn for me so I could continue the happy making on my own.

Which I did. I made a chick family and a rabbit family, plus felt food befitting the needs of their species. Not very adventurous, I know. But wait - here it gets interesting. The chick family was frighteningly improper. I constructed, by using the same pompom templates in different sizes (what people in fabric circles refer to as "grading"), gigantic chick parents and a bunch of small children chicks. My mother, bless her scientifically-precise brain, gently suggested that the parental form of this particular avian species was the "chicken". Which was not the same as "chick". Her theory was that chickens were anatomically different and that chicks, no matter how volumetrically superior, could never be parents, and would always remain in their juvenile capacity. I pooh-poohed her; everyone knew, I maintained, that the large version of any animal was the parent and the small, the offspring. End of story. My mother eventually surrendered, as I knew she would, and I happily played with my genetically-bizarre chick family.

I am happy to report that, thanks to years of Biology lessons and appropriate children's literature, I am no longer a devotee of the Large Parent Small Child belief. Which is fortunate; otherwise, my Chicken sewing pattern, beloved by my children and blog readers everywhere, would have turned out quite differently. Looking back, I also marvel that my children now subscribe to exactly the same Large Parent Small Child theory that I did as a kid, with the exception that they generalize it to inanimate objects as well e.g. "The big pancake is the mother pancake, and the small one is the baby pancake." The scientist part of me thinks that it is how children make sense of their world and the relationships between the millions of random things around them. The mother part of me, however, just laughs at how crazy-funny it all is, and mourns the day when my kids outgrow their whimsical beliefs and become the dead-boring logical realists that adults are.

Back to rabbits now. The rabbit family I'd made suffered none of the criticism endured by the poor beleaguered chick family. This was because -and my logical mother would be relieved- baby bunnies were exactly the same as their parents, only smaller, and could therefore be safely made with the same templates graded down a couple sizes, without breaking any laws of nature. I remember that story while making the bunnies for Kate's party because they are almost a replica of that rabbit family I made years ago. I modified their faces, inspired by this delightful tutorial, but otherwise, they are the same pompom bunnies from my childhood.

Here's how we made ours. We used the thickest yarn we could find. Thick yarn is best for pompoms because they fill the forms quickly, which is especially important when you are mass-producing dozens of them. 

Read full article and get instructions here... Yarn Bunnies

Monday, February 29, 2016

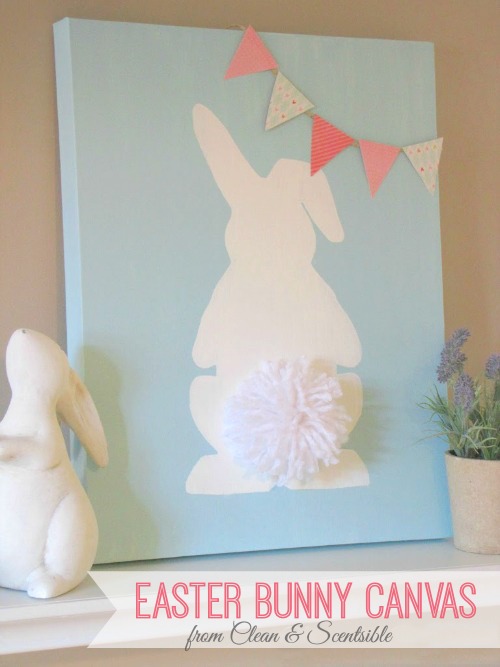
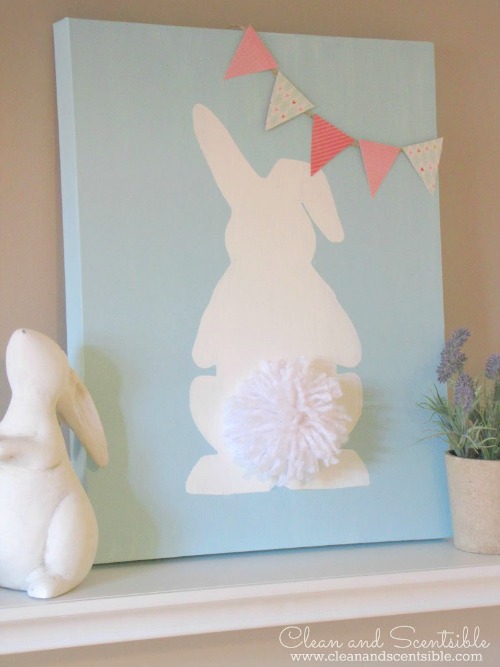
Easter Bunny Canvas

Happy Monday!  I hope you all had a wonderful weekend!  It’s been quite rainy and dreary around here lately so I decided to get going on some Easter crafting this weekend.  Just a little reminder that Spring is somewhere around the corner!

Easter Bunny Canvas with pom pom tail.

Cute Easter bunny bunting! This is so easy to make with a free printable template. // cleanandscentsible.com

I guess you can say that I have a “thing” for bunny butts.  I just had to add another one to the collection and came up with this cute Easter bunny canvas.


Easter Bunny Canvas with Pom Pom Tail.

MATERIALS
  • canvas {mine is 16 x 20}
  • craft paint {I used Martha Stewart “Cloud”}
  • vinyl or other bunny stencil {I purchased mine from the Silhouette StoreYou just need to ungroup and use the one down in the corner!}
  • white yarn
  • scrapbook paper
  • double sided tape
  • twine
Read full article and get instructions here... Easter Bunny Canvas

Thursday, February 11, 2016

RASPBERRY ZINGER CAKE

If you love the popular snack cake, you’ll love this Raspberry Zinger Cake!! Sturdy yellow sponge cake is coated in raspberry and coconut and filled with marshmallow frosting.

Please tell me I’m not the only grown person obsessed with snack cakes.
Someone really needs to make a perfume that smells like the bread and snack cake aisle at the grocery store.  It’s seriously my favorite.  Sugar, carbs, does it even get better?
Sometimes I hide the good Twinkies and save the Little Debbies for the kids.  Not that there’s anything wrong with Little Debbies, but we all know they’re B Tier.
You know you have a junk food problem when you’ve invented a snack cake hierarchy. The bad things about snack cakes is that they’re not really acceptable for parties.  If you show up with a box of Twinkies or Zingers, it’s honestly a little tacky.  People will still eat them, and stick them in their coat pocket for later, but no one wants to be seen eating the packaged stuff when there are homemade treats all around.
Soooo…I’ve kind of found a loophole.
Read the rest of the article here... RASPBERRY ZINGER CAKE

Tuesday, February 9, 2016

Spring to Summer Wreath


This has to be one of my favorite Spring wreath of all time. Ann from On Sutton Place made the easiest and cutest tutorial on how to make one yourself! The first thing she did was cut apart the bushes of flowers. Just fan them out and use wire cutters to cut the stems off as close to the end as possible. You want single stems that can be easily inserted into the grapevine.

Read the rest of the tutorial here.... Spring to Summer Wreath

Thursday, April 16, 2015

DIY Wainscoting


I knew when we build our house that I wanted to do something with my walls. I also new that I wanted it to be something different. It seemed that everyone was doing the same things and I wanted something different. I don't really like to follow the crowd. When I saw a picture of this wainscoting I was sold. I loved everything about it. I have it on two walls so far in my house and I have plans to put it up on four more.

If you can use a saw and make 45 degree cuts then you can do this!

Thursday, March 26, 2015

All My Favorite Easter Decor!


One thing that I like to do is collect ideas. Let me tell you how excited I was to find pinterest! Easter is a fun holiday to decorate for because you get to have all of the fun inviting spring colors. I love to decorate with pastels with the more natural antique look.

Thursday, March 19, 2015

The Most Adorable Easter Wreath!


Okay I just about fell off my chair when I found this Spring/Easter wreath. I mean isn't this just the cutest wreath that you have ever seen? I am so in love! This will for sure be on my to do list for spring decor. I am not sure if I will get to this this year, but for sure next year!

Tuesday, December 16, 2014

8 Super Fun Hot Chocolate Stations!


Have you seen how cute these are? I love the idea of having a hot chocolate bar for my family. Heaven knows that my kids go through hot chocolate during the winter months like it is going our of style. I might have to find some kid friendly containers and give this a try!

Thursday, December 11, 2014

Christmas Wreath DIY Tutorial

I decided that this year I wanted to update my Christmas wreath for my front door. I was super lucky and found the perfect grape vine wreath at the thrift store a couple of years ago for only a couple of dollars. I didn't know what I was going to use it for  when I bought it, but when I decided to do this project I knew that it was perfect!


I knew that when I made this wreath I wanted to use a monogram of our last name on it. I had a wooden "g" that I had previously purchased form the Wood Connection. I love this place they have the cutest things available all year long. You can check them out here

Tuesday, December 9, 2014

12 Creative Gingerbread House Ideas

I love this time a year. There are so many different activities that you can do with your kids. One of my favorite things to do is make a gingerbread house with my family. There are so many cute ideas out there for making the perfect gingerbread house. Here are some of my favorite.


Monday, December 8, 2014

12 easy diy christmas gifts


Christmas time is the perfect time of the year to get your craft on and make some cute Christmas presents. Here is a quick list of some of the cutest and fairly easy presents that you can create all by yourself for cheap!


Thursday, December 4, 2014

Fabric Rosette Tutorial


Okay I know that most people know how to make these fabric rosettes, but I am sure that someone out there doesn't have a clue and would like to know. So in honor of that person out there I have whipped up a quick tutorial on how to make a fabric rosette.

1. You need to decide what fabric you want. You don't need a special kind of fabric, just plain old cotton fabric will do. Just decide what print or color you want.

2. Cut or rip your fabric into strips that are anywhere from three to seven or eight inches wide and about twelve inches long. You can have them longer if you want bigger rosettes.

3. Tie a knot at the end on one of the strips of fabric and then hot glue the knot down on another piece of fabric. I like to use felt, but you can use the same cotton fabric if you want.

4. Then twist the fabric and glue down around the knot like the picture shown below.


5. Once you get the size of rosette that you want, cut the remaining fabric off leaving about an inch. Then fold the inch of fabric over to the other side and tack it down with hot glue.

There you go. Easy peasy right? Now you can go on to make lots of cute things with rosettes of all colors.

Thursday, October 23, 2014

DIY Chevron Wall


Okay so this is a project that I started just two weeks after we moved into our house in January of 2013. We still had many boxes to unpack and all sorts of things to organize. I how ever couldn't wait to get my DIY on. Oh look at how clean and white my walls were!

If this is a project that you have seen before and thought that it is so cute and you want it in your house then let me just warn you that this is not a project for the faint of heart. This takes time and attention to detail. Believe me it was very hard to start drawing all over my brand new walls and then tape that bad boy up.

If you don't feel intimidated and you are pretty confident in your taping abilities then feel free to make your walls look amazing! 

Here are a few tips that I would give you before you start though:

1. Invest in a high quality painters tape. You want straight lines that don't bleed and the only way to get that is with a good tape.

2. Draw on your walls using a ruler and pencil. Make sure that you have everything measured out and drawn before you start taping. You can see my rectangles on the wall. Mine were 5 inches by 10 inches. This will make it so much easier once you start taping.

3. Draw lightly! You don't want to have grove marks in your wall or dark lines that you might have to erase afterwords. Don't make more work then you need to.

I hope that these tips help you out. This was a fun project that was frustrating at times but so worth it in the end! 

Saturday, October 18, 2014

Super Cute Christmas Gift: DIY Baby Doll Diapers!


I saw this idea on Pinterest a couple of years ago and I thought that it was so cute! I was pregnant with my first daughter at the time and I knew that this was something that I wanted to keep for future reference. 

Little did I know that these little cloth baby doll diapers would be a huge hit and to top it off they were super fast and easy to make.

I am going to give you the lay down on how easy it was to make these!

What you will need:

- Pick out some cute pattern fabric. I chose flannel, 1/4 yard made four diapers.
- 1/4 yard of fabric for the inside of the diaper. I went with a white terry cloth.
- Velcro
- Thread

Next you need to cut out a pattern for your diapers. The best way to do this is to find the baby doll that you are going to be making the diapers for and measure and guess. Lay the doll down on a piece of paper and get an idea of how big you need the pattern. Then eyeball it and draw something similar to this:

Cut your piece out and then grab your doll and wrap it around the doll to make sure that it will be the right size. You can make the straps on the top longer if you want, but not to much.

Once you have your pattern just right the next thing that you want to do is lay out your fabric and start cutting. I did this part two at a time. so fold your fabric in half and cut out two pieces on each types of fabric (your flannel and terry cloth).

Then layer one flannel piece and one terry cloth piece right sides together and sew together leaving enough room at one end to turn inside out. Don't forget to back stitch when you start and finish this step. This will make it easier to turn inside out.

Next turn the diaper inside out and fold in your unfinished end and pin it closed.

Finally you are ready to sew the Velcro onto the diaper. Cut out your pieces of Velcro and sew them to the diaper like shown.


Make sure that you sew them on good, because if your daughter and her friends are anything like mine then these will be used a lot and with a lot of tough love!

I hope that you enjoyed this little tutorial and I hope that they turned out as cute as mine!


Thursday, October 16, 2014

Wicked Witch Boots


I think that one of my favorite places to get ideas and crafts is the Wood Connection. That is where I found these cute witch boots. There's were orange, but I wanted mine to be purple.
They were fun and easy to make. I think from start to finish they took maybe two hours and that was giving them time to dry and me having to help my kids every once and a while.

I like them. I am glad that I made them. Check out the Wood Connection if you haven't. They have so many cute things there.

If you like the table runner check out my post on how to make it!

Have you found some cute witch boots?

Tuesday, October 14, 2014

HaLlOwEeN Candy Corn Wreath


 I finally finished one of my many projects for Halloween this year. I have so many and I kept on running into problems with other projects that I felt that I was never going to get done, so I got a simple one done today and I feel better. Just a little bit better. I think listening to Christmas music while I worked helped :)

This is so easy to make. What you will need is a foam wreath, lots of hot glue some ribbon and candy corn. I used two bags.                  

All you have to do is hot glue the candy corn around the wreath and when you start a new row switch the direction of the candy until you are done. Easy as that!


Once you are finished with the wreath it will look like this:


Add some cute ribbon and tie a cute bow. I used my Bowdabra to make the bow. And all finished ta-da!! It didn't take that long and it is cute. Why did I wait so long to make one of these?

What cute candy wreaths have you see or tried to make lately?


Related Posts Plugin for WordPress, Blogger...